TensorFlow.js 是TensorFlow 的JavaScript 版本,支持GPU硬件加速,可以运行在Node.js或浏览器环境中。它不但支持完全基于 JavaScript 从头开发、训练和部署模型,也可以用来运行已有的Python版 TensorFlow 模型,或者基于现有的模型进行继续训练。
TensorFlow.js 支持 GPU 硬件加速。在 Node.js 环境中,如果有 CUDA 环境支持,或者在浏览器环境中,有 WebGL 环境支持,那么 TensorFlow.js 可以使用硬件进行加速。
微信小程序
微信小程序也提供了官方插件,封装了 TensorFlow.js 库,利用小程序 WebGL API给第三方小程序调用时提供 GPU 加速。
本章,我们将基于 TensorFlow.js 1.0,向大家简单地介绍如何基于 ES6 的 JavaScript 进行 TensorFlow.js 的开发,然后提供两个例子,并基于例子进行详细的讲解和介绍,最终实现使用纯 JavaScript 进行 TensorFlow 模型的开发、训练和部署。
章节代码地址
本章中提到的 JavaScript 版 TensorFlow 的相关代码,使用说明,和训练好的模型文件及参数,都可以在作者的 GitHub 上找到。
地址:https://github.com/huan/tensorflow-handbook-javascript
浏览器中使用 TensorFlow.js 的优势
TensorFlow.js 可以让我们直接在浏览器中加载 TensorFlow,让用户立即通过本地的CPU/GPU 资源进行我们所需要的机器学习运算,更灵活地进行AI应用的开发。
浏览器中进行机器学习,相对比与服务器端来讲,将拥有以下四大优势:
不需要安装软件或驱动(打开浏览器即可使用);
可以通过浏览器进行更加方便的人机交互;
可以通过手机浏览器,调用手机硬件的各种传感器(如:GPS、电子罗盘、加速度传感器、摄像头等);
用户的数据可以无需上传到服务器,在本地即可完成所需操作。
通过这些优势,TensorFlow.js 将给开发者带来极高的灵活性。比如在 Google Creative Lab 在 2018 年 7 月发布的 Move Mirror 里,我们可以在手机上打开浏览器,通过手机摄像头检测视频中用户的身体动作姿势,然后通过对图片数据库中类似身体动作姿势的检索,给用户显示一个最能够和他当前动作相似的照片。在 Move Mirror 的运行过程中,数据没有上传到服务器,所有的运算都是在手机本地,基于手机的 CPU/GPU 完成的,而这项技术,将使 Servreless 与 AI 应用结合起来成为可能。
Move Mirror
https://experiments.withgoogle.com/move-mirror
Move Mirror 所使用的 PoseNet
https://github.com/tensorflow/tfjs-models/tree/master/posenet
TensorFlow.js 环境配置
在浏览器中使用 TensorFlow.js
在浏览器中加载 TensorFlow.js ,最方便的办法是在 HTML 中直接引用 TensorFlow.js 发布的 NPM 包中已经打包安装好的 JavaScript 代码。
在 Node.js 中使用 TensorFlow.js
服务器端使用 JavaScript ,首先需要按照NodeJS.org官网的说明,完成安装最新版本的 Node.js 。
然后,完成以下四个步骤即可完成配置:
1. 确认 Node.js 版本(v10 或更新的版本):
$ node --verion v10.5.0 $ npm --version 6.4.1
2. 建立 TensorFlow.js 项目目录:
$ mkdir tfjs $ cd tfjs
3. 安装 TensorFlow.js:
# 初始化项目管理文件 package.json $ npm init -y # 安装 tfjs 库,纯 JavaScript 版本 $ npm install @tensorflow/tfjs # 安装 tfjs-node 库,C Binding 版本 $ npm install @tensorflow/tfjs-node # 安装 tfjs-node-gpu 库,支持 CUDA GPU 加速 $ npm install @tensorflow/tfjs-node-gpu
4. 确认 Node.js 和 TensorFlow.js 工作正常:
$ node > require('@tensorflow/tfjs').version { 'tfjs-core': '1.3.1', 'tfjs-data': '1.3.1', 'tfjs-layers': '1.3.1', 'tfjs-converter': '1.3.1', tfjs: '1.3.1' } >
如果你看到了上面的 tfjs-core, tfjs-data, tfjs-layers 和 tfjs-converter 的输出信息,那么就说明环境配置没有问题了。
然后,在 JavaScript 程序中,通过以下指令,即可引入 TensorFlow.js:
import * as tf from '@tensorflow/tfjs' console.log(tf.version.tfjs) //Output: 1.3.1
使用import加载 JavaScript 模块
import 是 JavaScript ES6 版本新开始拥有的新特性。粗略可以认为等价于 require。比如:import * as tf from '@tensorflow/tfjs'和 const tf = require('@tensorflow/tfjs')对上面的示例代码是等价的。希望了解更多的读者,可以访问MDN 文档(https://developer.mozilla.org/en-US/docs/Web/JavaScript/Reference/Statements/import)。
在微信小程序中使用 TensorFlow.js
TensorFlow.js 微信小程序插件封装了 TensorFlow.js 库,用于提供给第三方小程序调用。
在使用插件前,首先要在小程序管理后台的 “设置 - 第三方服务 - 插件管理” 中添加插件。开发者可登录小程序管理后台,通过 appid _wx6afed118d9e81df9_ 查找插件并添加。本插件无需申请,添加后可直接使用。
例子:TFJS Mobilenet:物体识别小程序
https://github.com/tensorflow/tfjs-wechat/tree/master/demo/mobilenet
TensorFlow.js 微信小程序官方文档地址
https://mp.weixin.qq.com/wxopen/plugindevdoc?appid=wx6afed118d9e81df9
TensorFlow.js 微信小程序教程
为了推动微信小程序中人工智能应用的发展,Google 专门为微信小程序打造了最新TensorFlow.js 插件,并联合 Google认证机器学习专家、微信、腾讯课堂 NEXT 学院,联合推出了 “NEXT 学院:TensorFlow.js 遇到小程序” 课程,帮助小程序开发者带来更加易于上手和流畅的 TensorFlow.js 开发体验。
上述课程主要介绍了如何将 TensorFlow.js 插件嵌入到微信小程序中,并基于其进行开发。课程中以一个姿态检测的模型 PoseNet 作为案例,介绍了 TensorFlow.js 插件导入到微信小程序开发工具中后,在项目开发中的配置,功能调用,加载模型等方法应用;此外,还介绍了在 Python 环境下训练好的模型如何转换并载入到小程序中。
本章作者也参与了课程制作,课程中的案列简单有趣易上手,通过学习,可以快速熟悉 TensorFlow.js 在小程序中的开发和应用。有兴趣的读者可以前往 NEXT 学院,进行后续深度学习。
课程地址
https://ke.qq.com/course/428263
TensorFlow.js 模型部署
在浏览器中加载 Python 模型
一般 TensorFlow 的模型,会被存储为 SavedModel 格式。这也是 Google 目前推荐的模型保存最佳实践。SavedModel 格式可以通过 tensorflowjs-converter转换器转换为可以直接被 TensorFlow.js 加载的格式,从而在 JavaScript 语言中进行使用。
1. 安装tensorflowjs_converter
$ pip install tensorflowjs
tensorflowjs_converter的使用细节,可以通过--help参数查看程序帮助:
$ tensorflowjs_converter --help
2. 以下我们以 MobilenetV1 为例,看一下如何对模型文件进行转换操作,并将可以被 TensorFlow.js 加载的模型文件,存放到/mobilenet/tfjs_model 目录下。
转换 SavedModel:将/mobilenet/saved_model 转换到/mobilenet/tfjs_model
tensorflowjs_converter --input_format=tf_saved_model --output_node_names='MobilenetV1/Predictions/Reshape_1' --saved_model_tags=serve /mobilenet/saved_model /mobilenet/tfjs_model
转换完成的模型,保存为了两类文件:
model.json:模型架构
group1-shard*of*:模型参数
举例来说,我们对 MobileNet v2 转换出来的文件,如下:
/mobilenet/tfjs_model/model.json /mobilenet/tfjs_model/group1-shard1of5 … /mobilenet/tfjs_model/group1-shard5of5
3. 为了加载转换完成的模型文件,我们需要安装tfjs-converter和@tensorflow/tfjs模块:
$ npm install @tensorflow/tfjs
4. 然后,我们就可以通过 JavaScript 来加载 TensorFlow 模型了!
import * as tf from '@tensorflow/tfjs' const MODEL_URL = '/mobilenet/tfjs_model/model.json' const model = await tf.loadGraphModel(MODEL_URL) const cat = document.getElementById('cat') model.execute(tf.browser.fromPixels(cat))
转换 TFHub 模型
将 TFHub 模型https://tfhub.dev/google/imagenet/mobilenet_v1_100_224/classification/1转换到/mobilenet/tfjs_model:
tensorflowjs_converter --input_format=tf_hub 'https://tfhub.dev/google/imagenet/mobilenet_v1_100_224/classification/1' /mobilenet/tfjs_model
在 Node.js 中执行原生 SavedModel 模型
除了通过转换工具 tfjs-converter 将 TensorFlow SavedModel、TFHub 模型或 Keras 模型转换为 JavaScript 浏览器兼容格式之外,如果我们在 Node.js 环境中运行,那么还可以使用 TensorFlowC++的接口,直接运行原生的 SavedModel 模型。
在 TensorFlow.js 中运行原生的 SavedModel 模型非常简单。我们只需要把预训练的 TensorFlow 模型存为 SavedModel 格式,并通过@tensorflow/tfjs-node 或 tfjs-node-gpu 包将模型加载到 Node.js 进行推理即可,无需使用转换工具 tfjs-converter。
预训练的 TensorFlow SavedModel 可以通过一行代码在 JavaScript 中加载模型并用于推理:
const model = await tf.node.loadSavedModel(path) const output = model.predict(input)
也可以将多个输入以数组或图的形式提供给模型:
const model1 = await tf.node.loadSavedModel(path1, [tag], signatureKey) const outputArray = model1.predict([inputTensor1, inputTensor2]) const model2 = await tf.node.loadSavedModel(path2, [tag], signatureKey) const outputMap = model2.predict({input1: inputTensor1, input2:inputTensor2})
此功能需要@tensorflow/tfjs-node 版本为 1.3.2 或更高,同时支持 CPU 和 GPU。它支持在 TensorFlow Python 1.x 和 2.0 版本中训练和导出的 TensorFlow SavedModel。由此带来的好处除了无需进行任何转换,原生执行 TensorFlow SavedModel 意味着您可以在模型中使用 TensorFlow.js 尚未支持的算子。这要通过将 SavedModel 作为 TensorFlow 会话加载到 C++ 中进行绑定予以实现。
使用 TensorFlow.js 模型库
TensorFlow.js 提供了一系列预训练好的模型,方便大家快速地给自己的程序引入人工智能能力。
模型库中模型分类包括图像识别、语音识别、人体姿态识别、物体识别、文字分类等。
模型库 GitHub 地址
https://github.com/tensorflow/tfjs-models
由于这些 API 默认模型文件都存储在谷歌云上,直接使用会导致中国用户无法直接读取。在程序内使用模型 API 时要提供 modelUrl 的参数,可以指向谷歌中国的镜像服务器。
谷歌云的 base url 是https://storage.googleapis.com,中国镜像的 base url 是https://www.gstaticcnapps.cn,模型的 url path 是一致的。以 posenet 模型为例:
谷歌云地址
https://storage.googleapis.com/tfjs-models/savedmodel/posenet/mobilenet/float/050/model-stride16.json
中国镜像地址
https://www.gstaticcnapps.cn/tfjs-models/savedmodel/posenet/mobilenet/float/050/model-stride16.json
在浏览器中使用 MobileNet 进行摄像头物体识别
这里我们将通过一个简单的 HTML 页面,来调用 TensorFlow.js 和与训练好的 MobileNet ,在用户的浏览器中,通过摄像头来识别图像中的物体是什么。
1. 我们建立一个 HTML 文件,在头信息中,通过将 NPM 模块转换为在线可以引用的免费服务 unpkg.com,来加载@tensorflow/tfjs 和@tensorflow-models/mobilenet 两个 TFJS 模块:
2. 我们声明三个 HTML 元素:用来显示视频的
:
3. 我们通过 JavaScript ,将对应的 HTML 元素进行初始化:video, image, status 三个变量分别用来对应
三个 HTML 元素,canvas 和 ctx 用来做从摄像头获取视频流数据的中转存储。model 将用来存储我们从网络上加载的 MobileNet:
const video = document.querySelector('video') const image = document.querySelector('img') const status = document.querySelector("p") const canvas = document.createElement('canvas') const ctx = canvas.getContext('2d') let model
4. main()用来初始化整个系统,完成加载 MobileNet 模型,将用户摄像头的数据绑定
async function main () { status.innerText = "Model loading..." model = await mobilenet.load() status.innerText = "Model is loaded!" const stream = await navigator.mediaDevices.getUserMedia({ video: true }) video.srcObject = stream await video.play() canvas.width = video.videoWidth canvas.height = video.videoHeight refresh() }
5. refresh()函数,用来从视频中取出当前一帧图像,然后通过 MobileNet 模型进行分类,并将分类结果,显示在网页上。然后,通过 setTimeout,重复执行自己,实现持续对视频图像进行处理的功能:
async function refresh(){ ctx.drawImage(video, 0,0) image.src = canvas.toDataURL('image/png') await model.load() const predictions = await model.classify(image) const className = predictions[0].className const percentage = Math.floor(100 * predictions[0].probability) status.innerHTML = percentage + '%' + ' ' + className setTimeout(refresh, 100) }
整体功能,只需要一个文件,几十行 HTML/JavaScript 即可实现。可以直接在浏览器中运行,完整的 HTML 代码如下:
运行效果截图如下。可以看到,水杯被系统识别为了 “beer glass” 啤酒杯,置信度 90% :
TensorFlow.js 模型训练 *
与 TensorFlow Serving 和 TensorFlow Lite 不同,TensorFlow.js 不仅支持模型的部署和推断,还支持直接在 TensorFlow.js 中进行模型训练。
在 TensorFlow 基础章节中,我们已经用 Python 实现过,针对某城市在 2013-2017 年的房价的任务,通过对该数据进行线性回归,即使用线性模型 y=ax+b 来拟合上述数据,此处 a 和 b 是待求的参数。
下面我们改用 TensorFlow.js 来实现一个 JavaScript 版本。
首先,我们定义数据,进行基本的归一化操作。
const xsRaw = tf.tensor([2013, 2014, 2015, 2016, 2017]) const ysRaw = tf.tensor([12000, 14000, 15000, 16500, 17500]) // 归一化 const xs = xsRaw.sub(xsRaw.min()) .div(xsRaw.max().sub(xsRaw.min())) const ys = ysRaw.sub(ysRaw.min()) .div(ysRaw.max().sub(ysRaw.min()))
接下来,我们来求线性模型中两个参数 a和 b的值。
使用 loss()计算损失;使用 optimizer.minimize()自动更新模型参数。
JavaScript 中的胖箭头函数 (FatArrowFunction)
从 JavaScript 的 ES6 版本开始,允许使用箭头函数(=>)来简化函数的声明和书写,类似于 Python 中的 lambda 表达式。例如,以下箭头函数:
const sum = (a, b) => { return a + b }
在效果上等价为如下的传统函数:
const sum = function (a, b) { return a + b }
不过箭头函数中没有自己的 this 和 arguments,不可以被当做构造函数 (new),也不可以被当做 Generator (无法使用 yield)。感兴趣的读者可以参考MDN 文档 以了解更多。
MCN 文档:https://developer.mozilla.org/en-US/docs/Web/JavaScript/Reference/Functions/Arrow_functions
TensorFlow.js 中的dataSync()系列数据同步函数
它的作用是把 Tensor 数据从 GPU 中取回来,可以理解为与 Python 中的.numpy()功能相当,即将数据取回,供本地显示,或本地计算使用。感兴趣的读者可以参考TensorFlow.js 文档 以了解更多。
TensorFlow.js 文档:https://js.tensorflow.org/api/latest/#tf.Tensor.dataSync
TensorFlow.js 中的sub()系列数学计算函数
TensorFlow.js 支持tf.sub(a, b)和a.sub(b)两种方法的数学函数调用。其效果是等价的,读者可以根据自己的喜好来选择。感兴趣的读者可以参考TensorFlow.js 文档 (https://js.tensorflow.org/api/latest/#sub)以了解更多。
const a = tf.scalar(Math.random()).variable() const b = tf.scalar(Math.random()).variable() // y = a * x + b. const f = (x) => a.mul(x).add(b) const loss = (pred, label) => pred.sub(label).square().mean() const learningRate = 1e-3 const optimizer = tf.train.sgd(learningRate) // 训练模型 for (let i = 0; i < 10000; i++) { optimizer.minimize(() => loss(f(xs), ys)) } // 预测 console.log(`a: ${a.dataSync()}, b: ${b.dataSync()}`) const preds = f(xs).dataSync() const trues = ys.arraySync() preds.forEach((pred, i) => { console.log(`x: ${i}, pred: ${pred.toFixed(2)}, true: ${trues[i].toFixed(2)}`) })
从下面的输出样例中我们可以看到,已经拟合得比较接近了。
a: 0.9339302778244019, b: 0.08108722418546677 x: 0, pred: 0.08, true: 0.00 x: 1, pred: 0.31, true: 0.36 x: 2, pred: 0.55, true: 0.55 x: 3, pred: 0.78, true: 0.82 x: 4, pred: 1.02, true: 1.00
可以直接在浏览器中运行,完整的 HTML 代码如下:
TensorFlow.js 性能对比
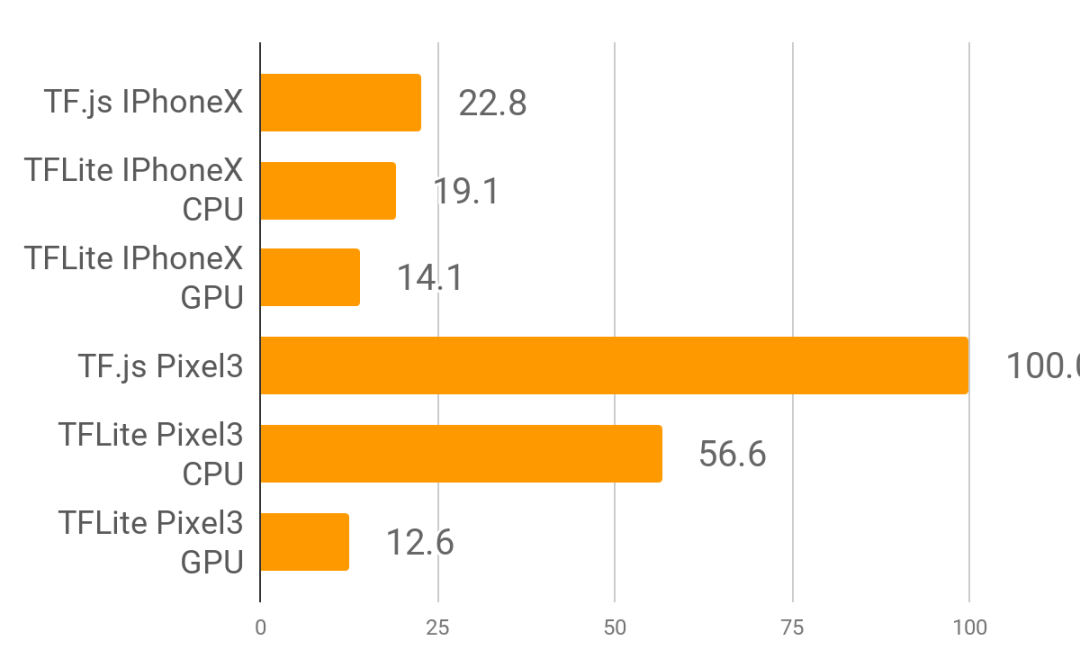
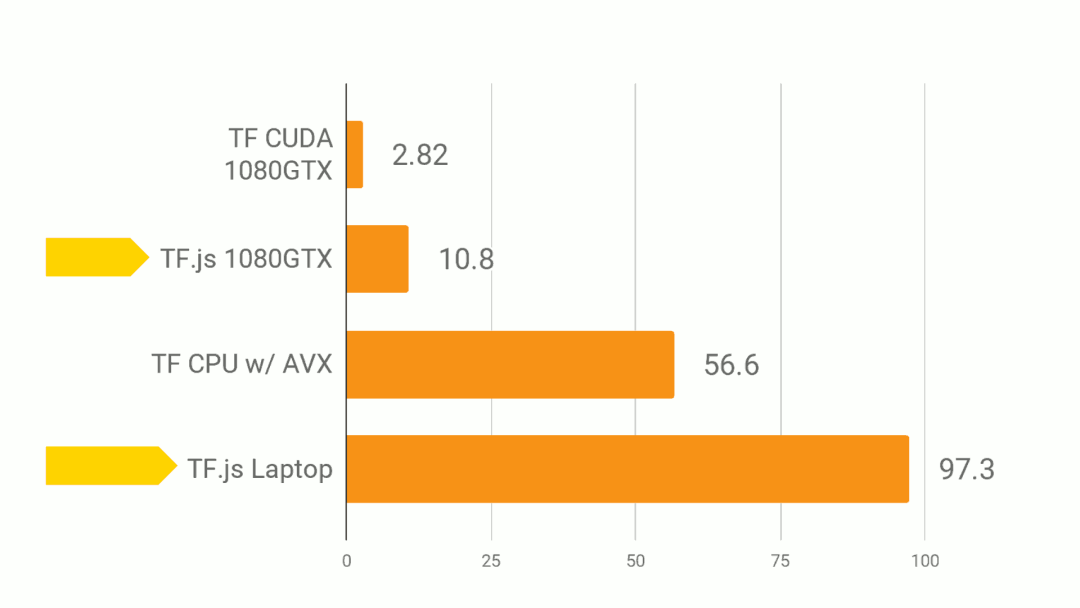
关于 TensorFlow.js 的性能,Google 官方做了一份基于 MobileNet 的评测,可以作为参考。具体评测是基于 MobileNet 的 TensorFlow 模型,将其 JavaScript 版本和 Python 版本各运行两百次,其评测结论如下。

手机浏览器性能:(单位:毫秒 ms)
TensorFlow.js 在手机浏览器中运行一次推理:
在iPhoneX 上需要时间为 22ms
在 Pixel3 上需要时间为 100ms
与 TensorFlow Lite 代码基准相比,手机浏览器中的 TensorFlow.js 在 IPhoneX 上的运行时间为基准的 1.2 倍,在 Pixel3 上运行的时间为基准的 1.8 倍。

台式机浏览器性能:(单位:毫秒 ms)
在浏览器中,TensorFlow.js 可以使用 WebGL 进行硬件加速,将 GPU 资源使用起来。
TensorFlow.js 在浏览器中运行一次推理:
在 CPU 上需要时间为 97ms
在 GPU (WebGL) 上需要时间为 10ms
与 Python 代码基准相比,浏览器中的 TensorFlow.js 在 CPU 上的运行时间为基准的 1.7 倍,在 GPU (WebGL) 上运行的时间为基准的 3.8 倍。
Node.js 性能:
在 Node.js 中,TensorFlow.js 可以用 JavaScript 加载转换后模型,或使用 TensorFlow 的 C++ Binding ,分别接近和超越了 Python 的性能。
TensorFlow.js 在 Node.js 运行一次推理:
在 CPU 上运行原生模型时间为 19.6ms
在 GPU (CUDA) 上运行原生模型时间为 7.68ms
与 Python 代码基准相比,Node.js 的 TensorFlow.js 在 CPU 和 GPU 上的运行时间都比基准快 4% 。
责任编辑:xj
原文标题:【抽奖送书】简单粗暴 TensorFlow.js:从安装到训练全程实例教学
文章出处:【微信公众号:TensorFlow】欢迎添加关注!文章转载请注明出处。
- gpu
+关注
关注
27文章
4566浏览量
128003 - API
+关注
关注
2文章
1453浏览量
61427 - python
+关注
关注
53文章
4748浏览量
83954 - tensorflow
+关注
关注
13文章
327浏览量
60380
原文标题:【抽奖送书】简单粗暴 TensorFlow.js:从安装到训练全程实例教学
文章出处:【微信号:tensorflowers,微信公众号:Tensorflowers】欢迎添加关注!文章转载请注明出处。
发布评论请先登录
相关推荐
使用TensorFlow进行神经网络模型更新
蔚来全新ES6获德国背脊健康协会座椅健康认证
javascript属于前端吗
javascript的文件扩展名
javascript的基本语法遵循的标准
JavaScript的语法和基本功能
JavaScript的用途和功能
javascript指什么
javascript运行环境有哪些
javascript深入浅出
javascript的成熟分类
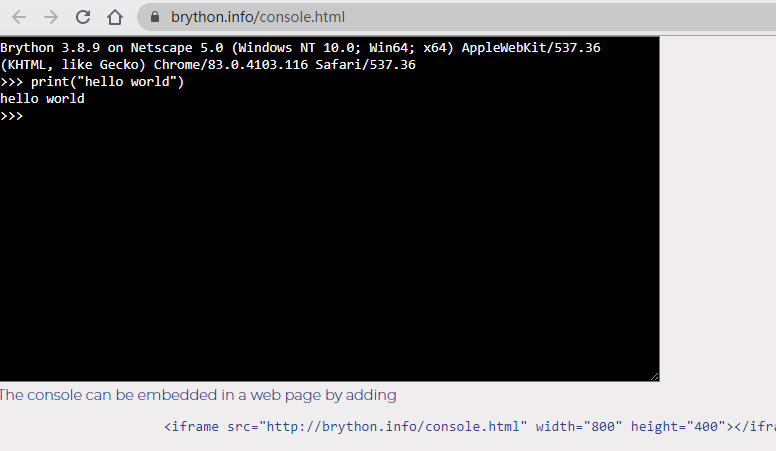
Brython:替代JavaScript的前端开发工具


 如何基于 ES6 的 JavaScript 进行 TensorFlow.js 的开发


评论