使用Platformio平台的libopencm3开发框架来开发STM32G0,以下为FreeRTOS和FreeModbus库使用。
1 新建项目
- 建立freertos_modbus项目
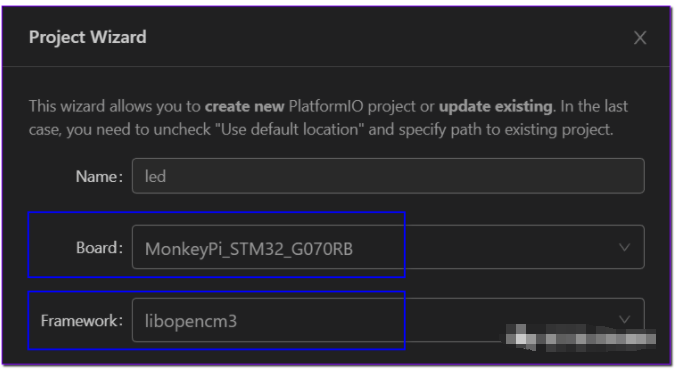
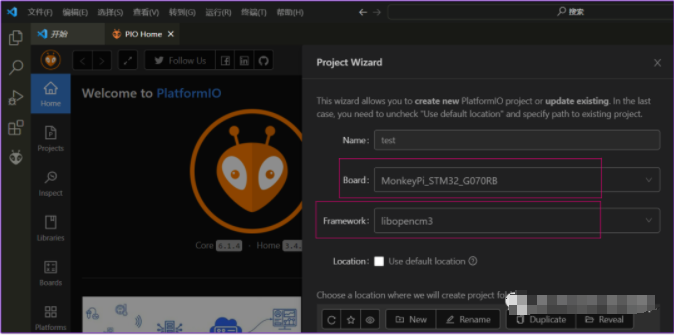
在PIO的Home页面新建项目,项目名称freertos_modbus,选择开发板为 MonkeyPi_STM32_G070RB,开发框架选择libopencm3;
1upload_protocol= cmsis-dap2debug_tool= cmsis-dap2 编写程序
直接在之前的FreeRTOS工程上进行添加;
2.1 添加 freeModbus 库
从git仓库下载源码: https://github.com/cwalter-at/freemodbus
将下载的源码中的mobus文件夹放置到工程的lib目录下,然后在modbus目录新建library.json文件,内容如下:
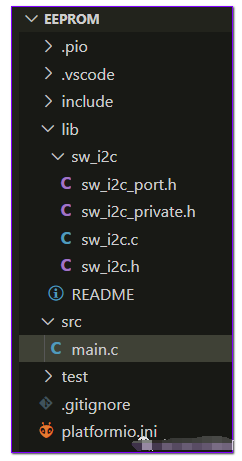
1{2"name":"FreeModbus",3"version":"master",4"repository":{5"type":"git",6"url":"https://github.com/cwalter-at/freemodbus"7},8"build": {9"flags": [10"-Iascii",11"-Ifunctions",12"-Iinclude",13"-Irtu",14"-Itcp"15],16"srcFilter": [17"+<*>"18]19}20}然后从FreeModbus源码中的 demo\\BARE\\port中复制文件到工程的src\\modbus_port文件夹下,最后的文件夹结构如下:
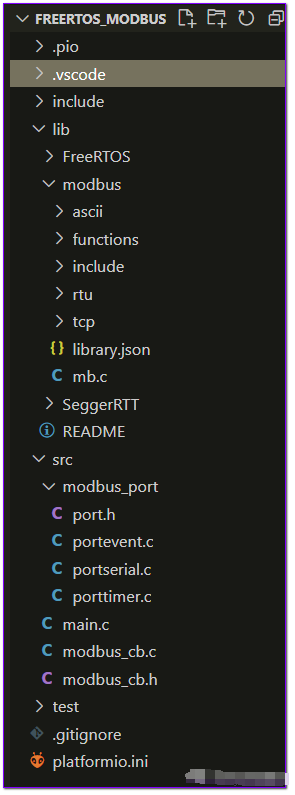
image-20220928231915800
2.2 移植
- portevent:
1/* ----------------------- Modbus includes ----------------------------------*/2#include"mb.h"3#include"mbport.h"4#include"FreeRTOS.h"5#include"task.h"67/* ----------------------- Variables ----------------------------------------*/8staticeMBEventType eQueuedEvent;9staticBOOLxEventInQueue;10staticuint32_t modbus_last_active_time =0;1112uint32_t get_modbus_last_active_time(void)13{14returnmodbus_last_active_time;15}1617/* ----------------------- Start implementation -----------------------------*/18BOOL19xMBPortEventInit(void)20{21xEventInQueue =FALSE;22returnTRUE;23}2425BOOL26xMBPortEventPost( eMBEventType eEvent )27{28xEventInQueue =TRUE;29eQueuedEvent = eEvent;3031if(eEvent == EV_EXECUTE) {32modbus_last_active_time = xTaskGetTickCount();33}34returnTRUE;35}3637BOOL38xMBPortEventGet( eMBEventType * eEvent )39{40BOOLxEventHappened =FALSE;4142if( xEventInQueue )43{44*eEvent = eQueuedEvent;45xEventInQueue =FALSE;46xEventHappened =TRUE;47}48returnxEventHappened;49}- portserial
这里使用RS485,因此需要对RS485使能端口进行配置,其他为串口的配置,然后在发送和接收中断时候调用modbus相关接口进行处理:
1#include"port.h"23#include"FreeRTOS.h"4#include"queue.h"56#include

           3/cm
           3/nvic.h>
           7#include

            3/stm
            32/usart.h>
            8#include

             3/stm
             32/rcc.h>
             9#include

              3/stm
              32/gpio.h>
              10
              11/* ----------------------- Modbus includes ----------------------------------*/
              12#include
              "mb.h"
              13#include
              "mbport.h"
              14
              15/* ----------------------- static functions ---------------------------------*/
              16
              17xQueueHandle
              uart_queue;
              18
              19#define RS
              485_
              1_CLOCK RCC_GPIOB
              20#define RS
              485_
              1_EN_PORT GPIOB
              21#define RS
              485_
              1_EN_PIN GPIO
              8
              22
              23staticvoid rs
              485_delay(int n)
              24{
              25while (--n) {
              26__asm__ volatile (
              "nop");
              27}
              28}
              29
              30staticinline void rs
              485_
              1_rx_mode(void)
              31{
              32gpio_clear(RS
              485_
              1_EN_PORT, RS
              485_
              1_EN_PIN);
              33}
              34
              35staticinline void rs
              485_
              1_tx_mode(void)
              36{
              37gpio_set(RS
              485_
              1_EN_PORT, RS
              485_
              1_EN_PIN);
              38}
              39
              40staticinline void rs
              485_gpio_init(void)
              41{
              42rcc_periph_clock_enable(RS
              485_
              1_CLOCK);
              43gpio_mode_setup(RS
              485_
              1_EN_PORT, GPIO_MODE_OUTPUT, GPIO_PUPD_NONE, RS
              485_
              1_EN_PIN);
              44
              45rs
              485_
              1_rx_mode();
              46}
              47
              48/* ----------------------- Start implementation -----------------------------*/
              49void
              50vMBPortSerialEnable( BOOL xRxEnable, BOOL xTxEnable )
              51{
              52/* If xRXEnable enable serial receive interrupts. If xTxENable enable
              53* transmitter empty interrupts.
              54*/
              55if (xRxEnable) {
              56rs
              485_delay(
              10000);
              57rs
              485_
              1_rx_mode();
              58rs
              485_delay(
              10000);
              59usart_enable_rx_interrupt(USART
              1);
              60}
              61else {
              62usart_disable_rx_interrupt(USART
              1);
              63}
              64
              65if (xTxEnable) {
              66rs
              485_delay(
              10000);
              67rs
              485_
              1_tx_mode();
              68rs
              485_delay(
              10000);
              69usart_enable_tx_interrupt(USART
              1);
              70}
              71else {
              72usart_disable_tx_interrupt(USART
              1);
              73
              74}
              75}
              76
              77BOOL
              78xMBPortSerialInit( UCHAR ucPORT, ULONG ulBaudRate, UCHAR ucDataBits, eMBParity eParity )
              79{
              80nvic_enable_irq(NVIC_USART
              1_IRQ);
              81
              82rcc_periph_clock_enable(RCC_GPIOB);
              83gpio_mode_setup(GPIOB, GPIO_MODE_AF, GPIO_PUPD_NONE, GPIO
              6| GPIO
              7);
              84gpio_set_af(GPIOB, GPIO_AF
              0, GPIO
              6| GPIO
              7);
              85
              86rcc_periph_clock_enable(RCC_USART
              1);
              87
              88/* Set up USART/UART pa
              rameters using the libopencm
              3helper functions */
              89usart_set_baudrate(USART
              1, ulBaudRate);
              90usart_set_databits(USART
              1, ucDataBits);
              91usart_set_stopbits(USART
              1, USART_STOPBITS_
              1);
              92usart_set_mode(USART
              1, USART_MODE_TX_RX);
              93
              94switch (eParity) {
              95case MB_PAR_ODD:
              96usart_set_parity(USART
              1, USART_PARITY_ODD);
              97break;
              98case MB_PAR_EVEN:
              99usart_set_parity(USART
              1, USART_PARITY_EVEN);
              100break;
              101default:
              102usart_set_parity(USART
              1, USART_PARITY_NONE);
              103break;
              104}
              105
              106usart_set_flow_control(USART
              1, USART_FLOWCONTROL_NONE);
              107
              108usart_enable(USART
              1);
              109
              110rs
              485_gpio_init();
              111
              112return TRUE;
              113}
              114
              115BOOL
              116xMBPortSerialPutByte( CHAR ucByte )
              117{
              118
              119usart_send_blocking(USART
              1, (uint
              16_t) ucByte);
              120
              121return TRUE;
              122}
              123
              124BOOL
              125xMBPortSerialGetByte( CHAR * pucByte )
              126{
              127*pucByte = usart_recv(USART
              1);
              128
              129return TRUE;
              130}
              131
              132
              133uint32_tuart
              1_isr, uart
              1_icr;
              134
              135voidusart
              1_isr(void)
              136{
              137
              138/* Check if we were cal
              ledbecause of RXNE. */
              139if (((USART_CR
              1(USART
              1) & USART_CR
              1_RXNEIE) !=
              0) &&
              140((USART_ISR(USART
              1) & USART_ISR_RXNE) !=
              0)) {
              141
              142/* Retrieve the data from the peripheral. */
              143// usart_recv(USART
              1);
              144
              145pxMBFrameCBByteReceived();
              146
              147}
              148
              149
              150/* Check if we were called because of TXE. */
              151if (((USART_CR
              1(USART
              1) & USART_CR
              1_TXEIE) !=
              0) &&
              152((USART_ISR(USART
              1) & USART_ISR_TXE) !=
              0)) {
              153
              154/* Put data into the transmit register. */
              155//usart_send(USART
              1, data);
              156
              157pxMBFrameCBTransmitterEmpty();
              158
              159}
              160
              161}
- porttimer
1#include"port.h"23#include
开启定时器和中断,用于modbus时序控制;
2.3 使用
在src目录新建 modbus_cb.h 和 modbus_cb.c 两个文件,实现寄存器、线圈的读写回调:
1/// CMD42eMBErrorCodeeMBRegInputCB( UCHAR * pucRegBuffer, USHORT usAddress, USHORT usNRegs );34/// CMD6、3、165eMBErrorCodeeMBRegHoldingCB( UCHAR * pucRegBuffer, USHORT usAddress, USHORT usNRegs, eMBRegisterMode eMode );67/// CMD1、5、158eMBErrorCodeeMBRegCoilsCB( UCHAR * pucRegBuffer, USHORT usAddress, USHORT usNCoils, eMBRegisterMode eMode );910/// CMD411eMBErrorCodeeMBRegDiscreteCB( UCHAR * pucRegBuffer, USHORT usAddress, USHORT usNDiscrete );基本的实现示例如下:
1#include"modbus_cb.h"2#include"stdbool.h"34externlog(constchar* fmt, ...);56// 输入寄存器7#defineREG_INPUT_SIZE 328uint16_tREG_INPUT_BUF[REG_INPUT_SIZE];910// 保持寄存器11#defineREG_HOLD_SIZE 3212uint16_tREG_HOLD_BUF[REG_HOLD_SIZE];1314// 线圈寄存器15#defineREG_COILS_SIZE 1616uint8_tREG_COILS_BUF[REG_COILS_SIZE];1718// 离散量19#defineREG_DISC_SIZE 820uint8_tREG_DISC_BUF[REG_DISC_SIZE];2122/// CMD423eMBErrorCodeeMBRegInputCB( UCHAR * pucRegBuffer, USHORT usAddress, USHORT usNRegs )24{25USHORT usRegIndex = usAddress -1;2627// 非法检测28if((usRegIndex + usNRegs) > REG_INPUT_SIZE)29{30returnMB_ENOREG;31}3233log(" CMD4, 寄存器输入.");3435// 填充数据36REG_INPUT_BUF[0] =0x01;37REG_INPUT_BUF[1] =0x02;3839// 循环读取40while( usNRegs >0) {41*pucRegBuffer++ = (unsignedchar)( REG_INPUT_BUF[usRegIndex] >>8);42*pucRegBuffer++ = (unsignedchar)( REG_INPUT_BUF[usRegIndex] &0xFF);43usRegIndex++;44usNRegs--;45}4647returnMB_ENOERR;48}4950/// CMD6、3、1651eMBErrorCodeeMBRegHoldingCB( UCHAR * pucRegBuffer, USHORT usAddress, USHORT usNRegs, eMBRegisterMode eMode )52{53USHORT usRegIndex = usAddress -1;5455// 非法检测56if((usRegIndex + usNRegs) > REG_HOLD_SIZE) {57returnMB_ENOREG;58}5960log(" CMD3,6,16, 保持寄存器读写.");6162// 写寄存器63if(eMode == MB_REG_WRITE) {64while( usNRegs >0) {65uint16_tvalue;6667value = (pucRegBuffer[0] <<8) | pucRegBuffer[1];6869log(" 写寄存器值:%d", value);7071pucRegBuffer +=2;72usRegIndex++;73usNRegs--;7475}7677}78// 读寄存器79else{8081log(" 读寄存器.");8283REG_HOLD_BUF[0] =0x32;84REG_HOLD_BUF[1] =0x33;8586while( usNRegs >0) {87*pucRegBuffer++ = (unsignedchar)( REG_HOLD_BUF[usRegIndex] >>8);88*pucRegBuffer++ = (unsignedchar)( REG_HOLD_BUF[usRegIndex] &0xFF);89usRegIndex++;90usNRegs--;91}92}9394returnMB_ENOERR;95}9697/// CMD1、5、1598eMBErrorCodeeMBRegCoilsCB( UCHAR * pucRegBuffer, USHORT usAddress, USHORT usNCoils, eMBRegisterMode eMode )99{100101USHORT usRegIndex = usAddress -1;102USHORT usCoilGroups = ((usNCoils -1) /8+1);103UCHAR ucStatus =0;104UCHAR ucBits =0;105UCHAR ucDisp =0;106107// 非法检测108if((usRegIndex + usNCoils) > REG_COILS_SIZE) {109returnMB_ENOREG;110}111112log(" CMD1,5,15, 线圈读写.");113114// 写线圈115if(eMode == MB_REG_WRITE) {116117while(usCoilGroups--) {118119ucStatus = *pucRegBuffer++;120ucBits =8;121122while((usNCoils) !=0&& (ucBits) !=0) {123boolflag = ucStatus &0x01;124125switch(usRegIndex) {126127case0:128log(" 线圈0 : %d", flag);//129break;130131case1:132log(" 线圈1 : %d", flag);133break;134135default:136137break;138139}140141usRegIndex++;142ucStatus >>=1;143usNCoils--;144ucBits--;145}146147}148}149// 读线圈150else{151152REG_COILS_BUF[0] =1;153REG_COILS_BUF[1] =0;154155while(usCoilGroups--) {156ucDisp =0;157ucBits =8;158ucStatus =0;159160while((usNCoils) !=0&& (ucBits) !=0) {161ucStatus |= (REG_COILS_BUF[usRegIndex++] << (ucDisp++));162usNCoils--;163ucBits--;164}165166*pucRegBuffer++ = ucStatus;167}168}169170returnMB_ENOERR;171}172173/// CMD4174eMBErrorCodeeMBRegDiscreteCB( UCHAR * pucRegBuffer, USHORT usAddress, USHORT usNDiscrete )175{176USHORT usRegIndex = usAddress -1;177USHORT usCoilGroups = ((usNDiscrete -1) /8+1);178UCHAR ucStatus =0;179UCHAR ucBits =0;180UCHAR ucDisp =0;181182// 非法检测183if((usRegIndex + usNDiscrete) > REG_DISC_SIZE) {184returnMB_ENOREG;185}186187log(" CMD4, 离散寄存器写入.");188189// 读离散输入190while(usCoilGroups--) {191ucDisp =0;192ucBits =8;193ucStatus =0;194195while((usNDiscrete !=0) && (ucBits !=0))196{197switch(usRegIndex) {198case0:199ucStatus =0x10;200break;201}202203usRegIndex++;204ucDisp++;205usNDiscrete--;206ucBits--;207}208*pucRegBuffer++ = ucStatus;209}210211returnMB_ENOERR;212}在main中创建modbus任务:
1staticvoidtask_modbus_handle(void*param)2{34eMBErrorCode eStatus;56log(" task modbus start.");78eStatus =eMBInit( MB_RTU,0x01,0,9600, MB_PAR_NONE );910/* Enable the Modbus Protocol Stack. */11eStatus =eMBEnable();1213(void)eStatus;1415for( ;; ) {16(void)eMBPoll();17vTaskDelay(pdMS_TO_TICKS(10));18}1920}3 烧写测试
将开发板连接到USB转485模块,然后使用modbus poll程序进行测试:
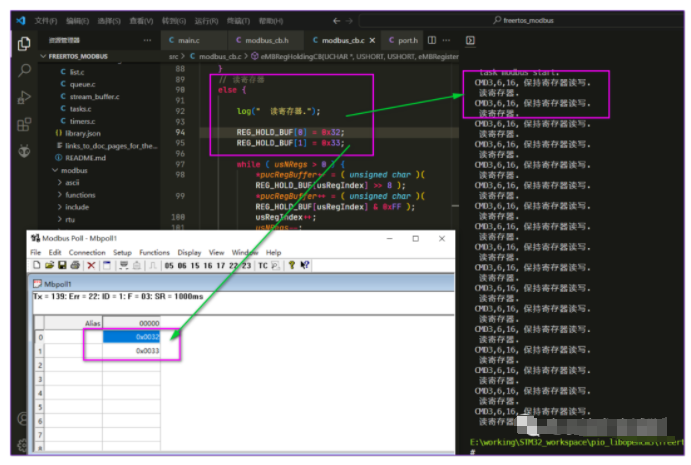
image-20220928232358657
- MODBUS
+关注
关注
28文章
1660浏览量
76240 - STM32
+关注
关注
2253文章
10779浏览量
351641 - 开发板
+关注
关注
25文章
4704浏览量
95772 - FreeRTOS
+关注
关注
12文章
476浏览量
61638 - FreeModbus
+关注
关注
0文章
16浏览量
4403
发布评论请先登录
相关推荐


 STM32G0开发笔记:FreeRTOS和FreeModbus库使用






评论