时间序列数据分析在工业,能源,医疗,交通,金融,零售等多个领域都有广泛应用。其中时间序列数据分类是分析时序数据的常见任务之一。本文将通过一个具体的案例,介绍Intel团队如何使用 TDengine 作为基础软件存储实验数据,并通过 TDengine 高效的查询能力在 OpenVINO 部署深度学习模型,最终在AIxBoard 开发板上实时运行分类任务。
01模型简介
近年来机器学习和深度学习在时序数据分类任务中取得了显著进展,HIVE-COTE和 InceptionTime 模型都取得了不错的成果。相比基于 Nearest Neighbor 和 DTW算法的 HIVE-COTE 模型,基于一维卷积 (Conv1D) 的 InceptionTime 模型成果更为显著,其在极大降低计算复杂度的基础上,还达到了与 HIVE-COTE 相当的分类精度。
如下图所示,Inception 模块是 InceptionTime 模型的基本组成模块,由多个一维卷积 (Conv1D) 操作堆叠,并于残差连接而成。
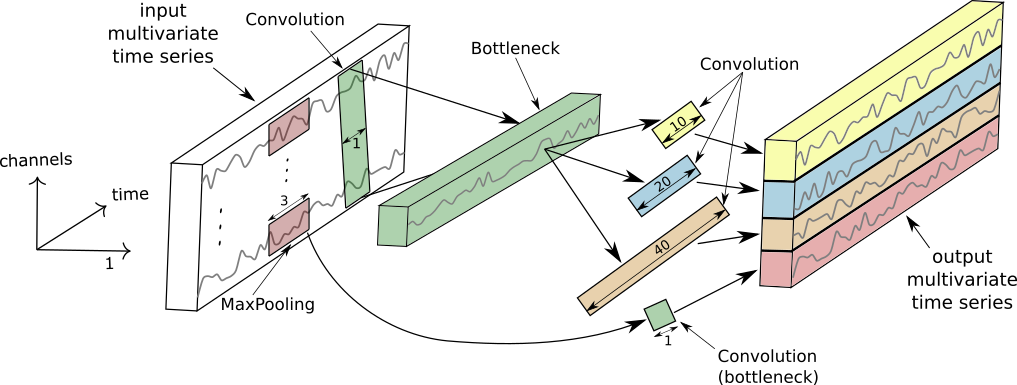
完整的 InceptionTime 模型由多个 Inception 模块连接而成。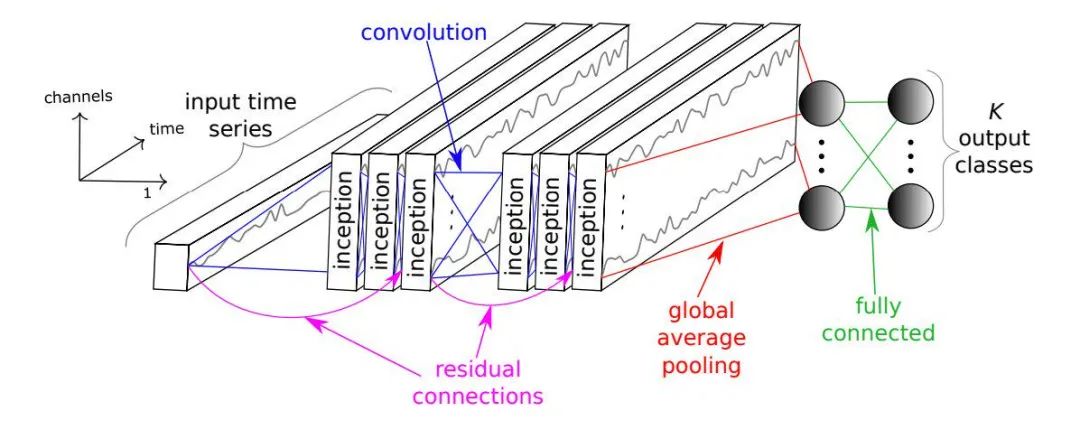 关于 InceptionTime 的更多细节请参考论文:https://arxiv.org/abs/1909.04939。
02数据集
本文采用的数据集来自http://timeseriesclassification.com/TSC.zip,由 128 个时间序列分类任务组成。其中的 Wafer 数据集包含 1000 条训练数据和和 6164 条测试数据,每条数据均包含标签值和长度 152 的时间序列数据。数据通过程序提前写入到 TDengine 中。
这里描述的时序数据是晶片生成过程中同一个工具通过单个传感器记录的时间序列数据。下图展示了正常 (class 1) 和异常 (class 0) 两种标签对应的时序数据示例。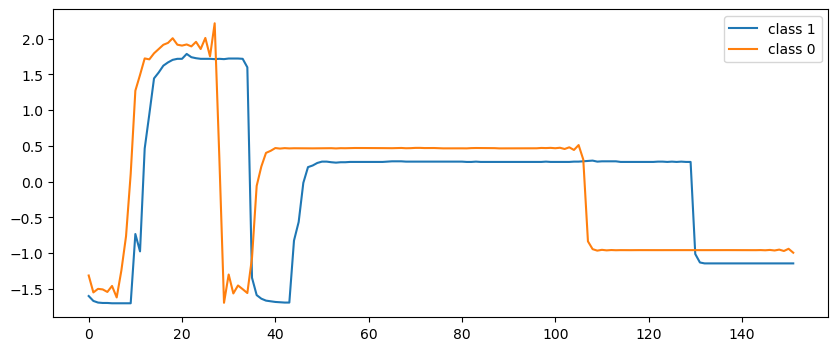
不难看出,这是一个标准的监督学习分类任务。我们希望找到一个模型,在每输入长度 152 的时序数据时,模型输出 0 或 1,以此判断输入时序数据对应的晶片在生成过程是否存在异常。
03模型训练
本文中我们将使用 Wafer 数据集训练一个 InceptionTime 模型。训练得到的模型可以根据晶片生产过程中传感器记录的时序数据,判断某个晶片的生产过程是否存在异常。
InceptionTime 的作者开源了基于tensorflow.keras 的实现,本文的模型代码基于 InceptionTime 开源版本并集成 TDengine 支持https://github.com/sangshuduo/InceptionTime。
首先加载Python库。
from os import path import numpy as np from sklearn import preprocessing from tensorflow import keras from tensorflow.keras.layersimport (Activation,Add, BatchNormalization, Concatenate, Conv1D, Dense, Input, GlobalAveragePooling1D, MaxPool1D ) from sqlalchemy import create_engine, text然后使用 TDengine 的 SQLAlchemy 驱动加载 Wafer 数据集并进行预处理。
def readucr(conn, dbName, tableName): data = pd.read_sql( text( "select * from " + dbName + "." + tableName ), conn, ) y = data[:, 0] x = data[:, 1:] return x, y def load_data(db): engine = create_engine("taos://root:taosdata@localhost:6030/" + db) try: conn = engine.connect() except Exception as e: print(e) exit(1) if conn is not None: print("Connected to the TDengine ...") else: print("Failedto connect to taos") exit(1) x_train, y_train = readucr(conn, db + '_TRAIN.tsv') x_test, y_test = readucr(conn, db + '_TEST.tsv') n_classes = len(np.unique(y_train)) enc = preprocessing.OneHotEncoder() y = np.concatenate((y_train, y_test), axis=0).reshape(-1,1) enc.fit(y) y_tr = enc.transform(y_train.reshape(-1,1)).toarray() y_te = enc.transform(y_test.reshape(-1,1)).toarray() x_tr, x_te = map(lambda x: x.reshape(x.shape[0], x.shape[1], 1), [x_train, x_test]) return x_tr, y_tr, x_te, y_te, n_classes x_tr, y_tr, x_te, y_te, n_classes = load_data('Wafer')
再使用 tensorflow.keras 实现 IncetionTime,并创建模型。
def inception_module(input_tensor, filters, kernel_size, bottleneck_size, activation='relu', use_bottleneck=True): if use_bottleneck and int(input_tensor.shape[-1]) > 1: input_inception = Conv1D(filters=bottleneck_size, kernel_size=1, padding='same', activation=activation, use_bias=False)(input_tensor) else: input_inception = input_tensor kernel_size_s = [kernel_size // (2 ** i) for i in range(3)] # [40, 20, 10] conv_list = [] for i in range(len(kernel_size_s)): conv = Conv1D(filters=filters, kernel_size=kernel_size_s[i], strides=1, padding='same', activation=activation, use_bias=False)(input_inception) conv_list.append(conv) max_pool = MaxPool1D(pool_size=3, strides=1, padding='same')(input_tensor) conv_6 = Conv1D(filters=filters, kernel_size=1, padding='same', activation=activation, use_bias=False)(max_pool) conv_list.append(conv_6) x = Concatenate(axis=2)(conv_list) x = BatchNormalization()(x) x = Activation(activation='relu')(x) return x def shortcut_layer(input_tensor, output_tensor): y = Conv1D(filters=int(output_tensor.shape[-1]), kernel_size=1, padding='same', use_bias=False)(input_tensor) y = BatchNormalization()(y) x = Add()([y, output_tensor]) x = Activation(activation='relu')(x) return x def build_model(input_shape, n_classes, depth=6, filters=32, kernel_size=40, bottleneck_size=32, use_residual=True): input_layer = Input(input_shape) x = input_layer input_res = input_layer for d in range(depth): x = inception_module(x, filters, kernel_size, bottleneck_size) if use_residual and d % 3 == 2: x = shortcut_layer(input_res, x) input_res = x gap_layer = GlobalAveragePooling1D()(x) output_layer = Dense(n_classes, activation="softmax")(gap_layer) model = keras.Model(input_layer, output_layer) return model model = build_model(x_tr.shape[1:], n_classes) model.compile( optimizer='adam', loss='categorical_crossentropy', metrics=['accuracy'] )
训练模型:
ckpt_path = path.sep.join(['.', 'models', 'inception_wafer.h5']) callbacks = [ keras.callbacks.ReduceLROnPlateau( monitor='val_loss', factor=0.5, patience=20, min_lr=0.0001 ), keras.callbacks.EarlyStopping(monitor='val_loss', patience=20, verbose=1), keras.callbacks.ModelCheckpoint( filepath=ckpt_path, monitor='val_loss', save_best_only=True ) ] batch_size = 32 epochs = 500 history = model.fit(x_tr, y_tr, batch_size, epochs, verbose='auto', shuffle=True, validation_split=0.2, callbacks=callbacks)简单显示一下训练过程:
metric = 'accuracy' plt.figure(figsize=(10, 5)) plt.plot(history.history[metric]) plt.plot(history.history['val_'+metric]) plt.title("model " + metric) plt.ylabel(metric, fontsize='large') plt.xlabel('epoch', fontsize='large') plt.legend(["train", "val"], loc="best") plt.show() plt.close()
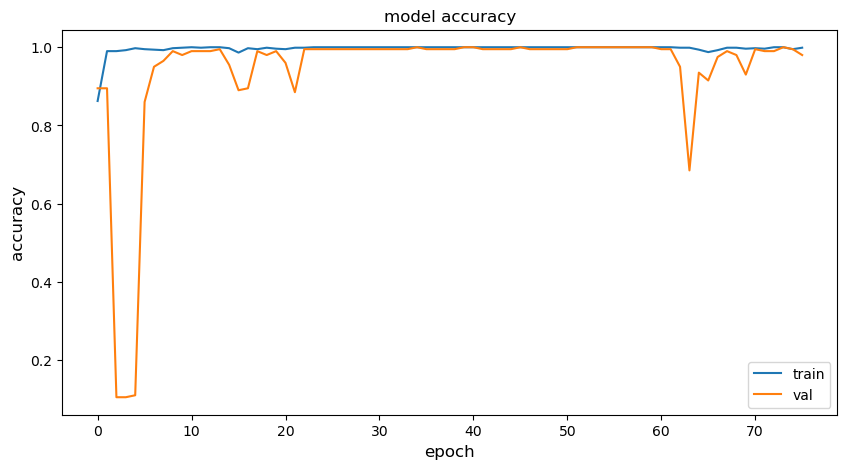
使用测试数据验证模型的推理精度。
classifier = keras.models.load_model(ckpt_path) test_loss, test_acc = classifier.evaluate(x_te, y_te) print("Test accuracy: ", test_acc) print("Test loss: ", test_loss)
193/193 [==============================] - 2s 11ms/step - loss: 0.0142 - accuracy: 0.9958 Test accuracy: 0.9957819581031799 Test loss: 0.014155667275190353
我们的模型在 Wafer 测试数据上取得了 99.58% 的精度。
04模型转换
为了达成使用 OpenVINO Runtime 进行推理计算的目的,我们需要将 tensorflow 模型转换为 OpenVINO IR 格式。
from pathlib import Path from openvino.tools import mo from tensorflow import keras model = keras.models.load_model('models/inception_wafer.h5') model_path = Path('models/inception.0_float') model.save(model_path) model_dir = Path("ov") model_dir.mkdir(exist_ok=True) ir_path = Path("ov/inception.xml") input_shape = [1, 152, 1] if not ir_path.exists(): print("Exporting TensorFlow model to IR...") ov_model = mo.convert_model(saved_model_dir=model_path, input_shape=input_shape, compress_to_fp16=True) serialize(ov_model, ir_path) else: print(f"IR model {ir_path} already exists.")
转换完成后,生成的 IR 格式模型被存储为模型定义文件 inception.xml 和二进制文件 inception.bin。
05模型部署
接下来我们在 AIxBoard 开发板上部署刚刚训练的 IncetpionTime 模型。首先将 inception.bin、inception.xml 和 Wafer_TEST.tsv 几个文件复制到 AIxBoard 板上。
加载 Python 库。
from pathlib import Path import numpy as np from openvino.runtime import Core, serialize
使用 OpenVINO 运行 Inception 模型。
ir_path = Path("inception.xml") core = Core() model = core.read_model(ir_path)
import ipywidgets as widgets device = widgets.Dropdown( options=core.available_devices + ["AUTO"], value='AUTO', description='Device:', disabled=False ) device
def readucr(filename, delimiter=' '): data = np.loadtxt(filename, delimiter=delimiter) y = data[:, 0] x = data[:, 1:] y[y==-1] = 0 return np.expand_dims(x, axis=2), y X, y = readucr('Wafer_TEST.tsv') compiled_model = core.compile_model(model, device_name=device.value) input_key = compiled_model.input(0) output_key = compiled_model.output(0) network_input_shape = input_key.shape counter = 0 for idx, i in enumerate(X): i = np.expand_dims(i, axis=0) r = compiled_model(i)[output_key] counter += 1 if r.argmax() == y[idx] else 0 print('{:.6f}'.format(counter/len(y)))
0.995782
使用 OpenVINO 推理的精度跟 tensorflow 模型推理精度一致,同样达到了 99.58%。我们在模型转换时将原模型数据格式压缩为 FP16,这一操作并没有导致精度下降。
性能测试
使用 OpenVINO 自带的 benchmark 工具可以轻松地在 AIxBoard 上进行性能测试。
benchmark_app -m inception.xml -hint latency -dCPU
[ INFO ] First inference took 8.59 ms [Step 11/11] Dumping statistics report [ INFO ] Execution Devices:['CPU'] [ INFO ] Count: 8683 iterations [ INFO ] Duration: 60012.27 ms [ INFO ] Latency: [ INFO ] Median: 6.44 ms [ INFO ] Average: 6.81 ms [ INFO ] Min: 6.34 ms [ INFO ] Max: 37.13 ms [ INFO ] Throughput: 144.69 FPS
benchmark_app -m inception.xml -hint latency -dGPU
[ INFO ] First inference took 10.58 ms [Step 11/11] Dumping statistics report [ INFO ] Execution Devices:['GPU.0'] [ INFO ] Count: 7151 iterations [ INFO ] Duration: 60026.34 ms [ INFO ] Latency: [ INFO ] Median: 7.50 ms [ INFO ] Average: 8.23 ms [ INFO ] Min: 7.04 ms [ INFO ] Max: 21.78 ms [ INFO ] Throughput: 119.13 FPS从上面结果可以看出, 使用 AIxBoard 的 CPU 运行 InceptionTime 模型推理,平均时长为 6.81ms。使用集成 GPU 推理,平均时长为 8.23ms。
06总结
本文介绍了如何利用 TDengine 支持时间序列数据的底层存储,以及如何通过分类模型 InceptionTime 在 UCR 时序数据集的 Wafer 分类任务上进行训练。最后,我们使用 OpenVINO 将该模型部署在 AIxBoard 开发板上,实现了高效的实时时序数据分类任务。希望本文的内容能够帮助大家在项目中利用 TDengine、OpenVINO 和 AIxBoard 来解决更多的时间序列分析问题。
01关于 AIxBoard
英特尔开发者套件 AIxBoard(爱克斯开发板)是专为支持入门级边缘 AI 应用程序和设备而设计,能够满足人工智能学习、开发、实训等应用场景。该开发板是类树莓派的 x86 主机,可支持LinuxUbuntu 及完整版 Windows操作系统,板载一颗英特尔 4 核处理器,最高运行频率可达 2.9 GHz,且内置核显(iGPU),板载 64GB eMMC 存储及 LPDDR4x 2933MHz(4GB/6GB/8GB),内置蓝牙和Wi-Fi模组,支持USB3.0、HDMI视频输出、3.5mm音频接口,1000Mbps以太网口,完全可把它作为一台 mini 小电脑来看待,且其可集成一块ArduinoLeonardo单片机,可外拓各种传感器模块。此外,其接口与 Jetson Nano 载板兼容,GPIO 与树莓派兼容,能够最大限度地复用树莓派、Jetson Nano 等生态资源,无论是摄像头物体识别,3D 打印,还是 CNC 实时插补控制都能稳定运行,不仅可作为边缘计算引擎用于人工智能产品验证、开发,也可作为域控核心用于机器人产品开发。
02关于 TDengine
TDengine 核心是一款高性能、集群开源、云原生的时序数据库(Time Series Database,TSDB),专为物联网、工业互联网、电力、IT 运维等场景设计并优化,具有极强的弹性伸缩能力。同时它还带有内建的缓存、流式计算、数据订阅等系统功能,能大幅减少系统设计的复杂度,降低研发和运营成本,是一个高性能、分布式的物联网、工业大数据平台。当前 TDengine 主要提供两大版本,分别是支持私有化部署的 TDengine Enterprise 以及全托管的物联网、工业互联网云服务平台 TDengine Cloud,两者在开源时序数据库 TDengine OSS 的功能基础上有更多加强,用户可根据自身业务体量和需求进行版本选择。
03关于作者
冯伟,英特尔软件架构师,16 年软件研发经验,涵盖浏览器、计算机视觉、虚拟机等多个领域。2015 年加入英特尔,近年来专注于边缘计算、深度学习模型落地,以及时序数据分析等方向。
审核编辑:汤梓红
- 英特尔
+关注
关注
60文章
9694浏览量
170397 - 机器学习
+关注
关注
66文章
8293浏览量
131687 - 深度学习
+关注
关注
73文章
5415浏览量
120442 - OpenVINO
+关注
关注
0文章
69浏览量
129
原文标题:TDengine + OpenVINO + AIxBoard,助力时序数据分类
文章出处:【微信号:英特尔物联网,微信公众号:英特尔物联网】欢迎添加关注!文章转载请注明出处。
发布评论请先登录
相关推荐
基于OpenVINO™和AIxBoard的智能安检盒子设计

多片段时序数据建模预测实践资料分享
关于时序数据库的内容
什么是时序数据库?
TDengine简介
TableStore时序数据存储 - 架构篇

时序数据库的前世今生
华为时序数据库为智慧健康养老行业贡献应用之道
华为PB级时序数据库Gauss DB,助力海量数据处理
物联网场景海量时序数据存储与处理的关键技术
涂鸦推出NekoDB时序数据库,助力全球客户实现低成本部署

时序数据库TDengine官网全新上线,四大亮点抢先看

基于OpenVINO和AIxBoard的智能安检盒子设计


 TDengine+OpenVINO+AIxBoard助力时序数据分类


评论