使用ArkTS语言开发(Stage模型)
说明:
开发前请熟悉鸿蒙开发指导文档:[gitee.com/li-shizhen-skin/harmony-os/blob/master/README.md]
请使用DevEco Studio 4.0 Beta2及更高版本。如果使用其它版本,可能存在文档与产品功能界面、操作不一致的情况,请以实际功能界面为准。
应用介绍
通过构建一个简单的ArkUI页面跳转示例,快速了解资源创建引用,路由代码编写和UI布局编写等应用开发流程。
导入应用模板
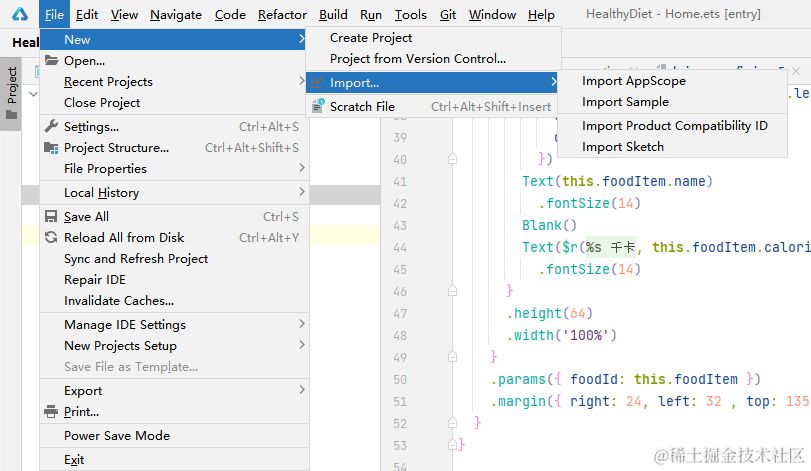
- 通过Import Samples导入helloworld工程。
ArkTS工程目录结构(Stage模型)
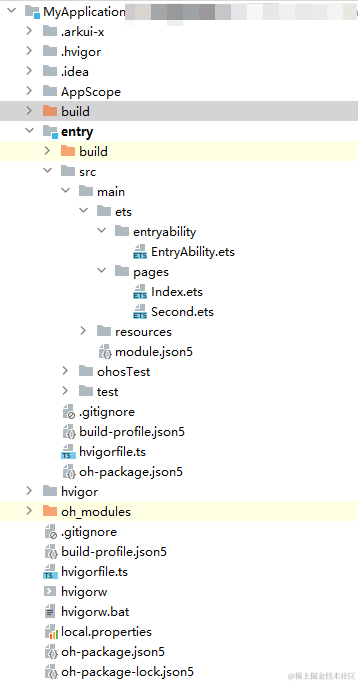
- AppScope > app.json5 :应用的全局配置信息。
- entry :OpenHarmony工程模块,编译构建生成一个HAP包。
- build :用于存放OpenHarmony编译生成的hap包。
- src > main > ets :用于存放ArkTS源码。
- src > main > ets > entryability :应用/服务的入口。
- src > main > ets > pages :应用/服务包含的页面。
- src > main > resources :用于存放应用/服务所用到的资源文件,如图形、多媒体、字符串、布局文件等。
- src > main > module.json5 :模块配置文件。主要包含HAP包的配置信息、应用/服务在具体设备上的配置信息以及应用/服务的全局配置信息。
- build-profile.json5 :当前的模块信息 、编译信息配置项,包括buildOption、targets配置等。
- hvigorfile.ts :模块级编译构建任务脚本,开发者可以自定义相关任务和代码实现。
- oh_modules :用于存放三方库依赖信息。
- build-profile.json5 :应用级配置信息,包括签名signingConfigs、产品配置products等。
- hvigorfile.ts :应用级编译构建任务脚本。
编写代码
在上述工程创建完成后,开发者可在项目中的entry目录下进行代码开发。
构建第一个页面
创建第一个页面。
1.在第一个页面添加Text组件、Button组件等,并设置其样式。
- 工程同步完成后,在“ Project ”窗口,点击“ entry > src > main > ets > pages ”,打开“ Index.ets ”文件,可以看到页面由Image,Button组件组成。“ Index.ets ”文件的示例如下:
// index.ets
 @Entry
 @Component
 struct Index {
   build() {
     Row() {
       Column() {
         Text()
           .fontSize(50)
           .fontWeight(FontWeight.Bold)
         // 添加按钮,以响应用户点击
         Button() {
           Text()
             .fontSize(30)
             .fontWeight(FontWeight.Bold)
         }
         .type(ButtonType.Capsule)
         .margin({
           top: 20
         })
         .backgroundColor()
         .width('40%')
         .height('5%')
       }
       .width('100%')
     }
     .height('100%')
   }
 }
构建第二个页面
- 创建第二个页面。
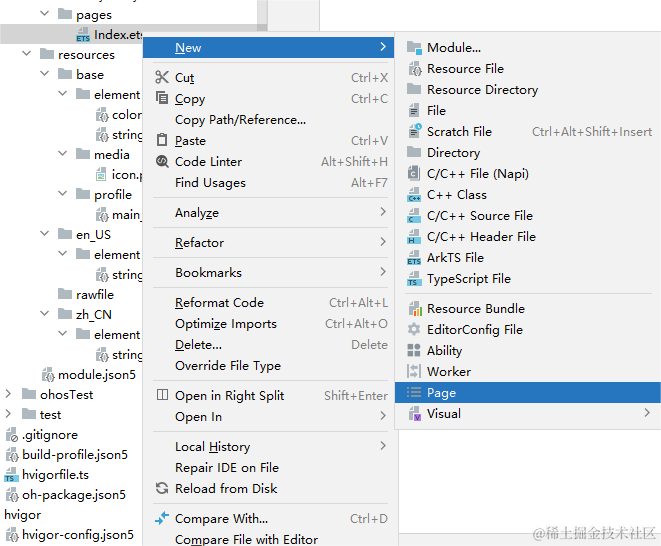
- 新建第二个页面文件。在“ Project ”窗口,打开“ entry > src > main > ets ”,右键点击“ pages ”文件夹,
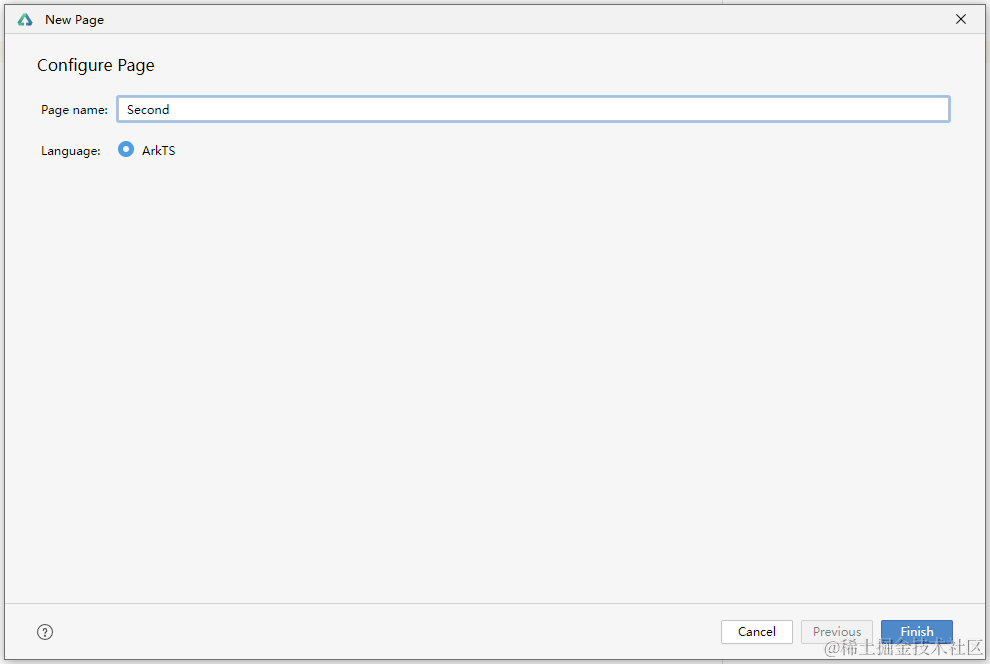
- 新建的页面命名为“ Second ”,点击“ Finish ”。
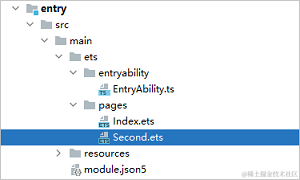
- 可以看到文件目录结构如下:
- 新建第二个页面文件。在“ Project ”窗口,打开“ entry > src > main > ets ”,右键点击“ pages ”文件夹,
- 添加文本及按钮。
参照第一个页面,在第二个页面添加Text组件、Button组件等,并设置其样式。“ Second.ets ”文件的示例如下:// second.ets @Entry @Component struct Second { build() { Row() { Column() { Text() .fontSize(50) .fontWeight(FontWeight.Bold) Button() { Text() .fontSize(25) .fontWeight(FontWeight.Bold) } .type(ButtonType.Capsule) .margin({ top: 20 }) .backgroundColor() .width('40%') .height('5%') } .width('100%') } .height('100%') } }
引用资源
1.定义需要被引用的文字资源:在“ Project ”窗口,点击“ entry > src > main > resources > base > element > string.json ”,打开“ string.json ”文件,加入蓝框的文字资源,如下图展示:
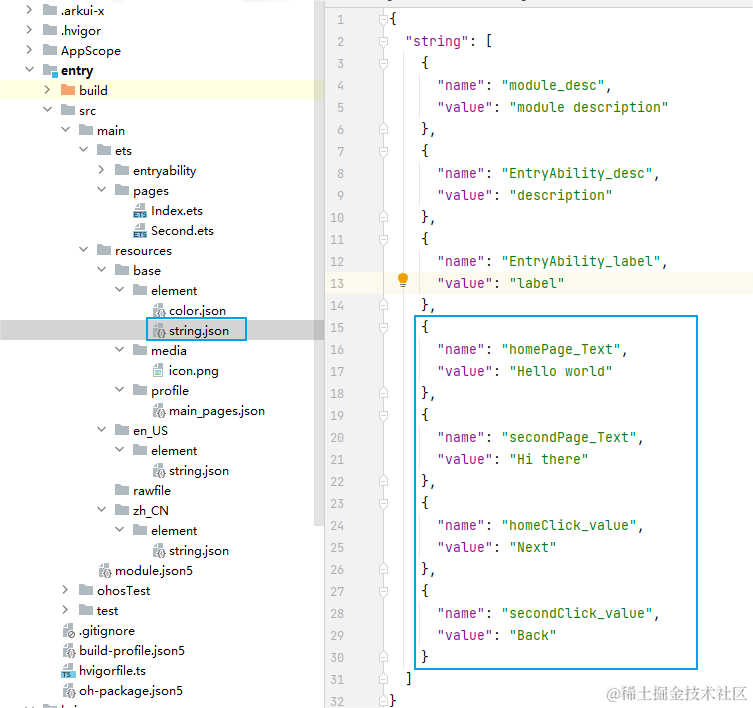
- 引用文字资源:在 Text() 中用 $r('app.string.xx') 的方式引用文字资源。
2.定义需要被引用的颜色资源:在“ Project ”窗口,点击“ entry > src > main > resources > base > element > color.json ”,打开“ color.json ”文件,加入蓝框的颜色资源,如下图展示:
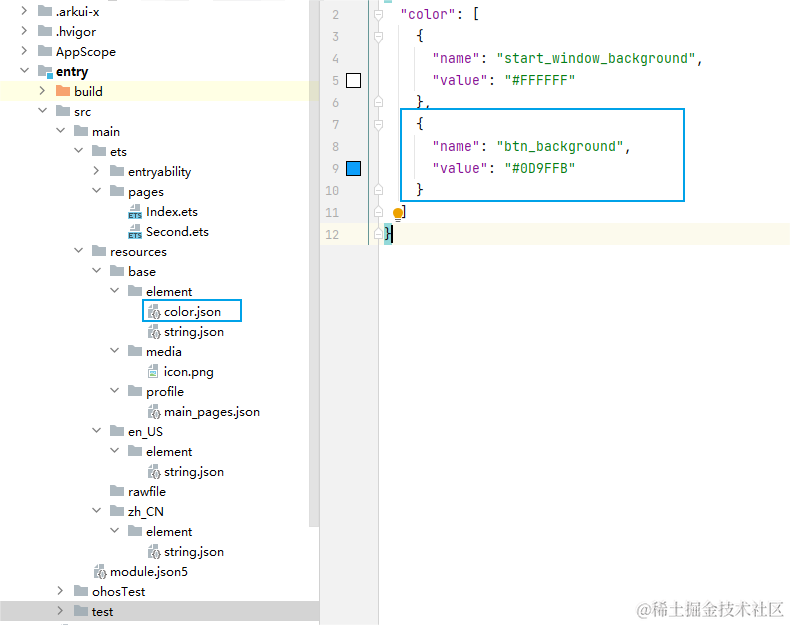
- 引用颜色资源:在 Button(){}.backgroundColor() 中用 $r('app.color.xx') 的方式引用颜色资源。
3.“ Index.ets ”文件的示例如下:
// index.ets
 @Entry
 @Component
 struct Index {
     build() {
       Row() {
         Column() {
           //引用文字资源
           Text($r('app.string.homePage_Text'))
             .fontSize(50)
             .fontWeight(FontWeight.Bold)
           Button() {
             //引用文字资源
             Text($r('app.string.homeClick_value'))
                 .fontSize(30)
                 .fontWeight(FontWeight.Bold)
           }
           .type(ButtonType.Capsule)
           .margin({
             top: 20
           })
           //引用颜色资源
           .backgroundColor($r('app.color.btn_background'))
           .width('40%')
           .height('5%')
         }
         .width('100%')
       }
       .height('100%')
     }
 }
4.“ Second.ets ”文件的示例如下:
// second.ets
 @Entry
 @Component
 struct Second {
     build() {
       Row() {
         Column() {
           //引用文字资源
           Text($r('app.string.secondPage_Text'))
             .fontSize(50)
             .fontWeight(FontWeight.Bold)
           Button() {
             //引用文字资源
             Text($r('app.string.secondClick_value'))
               .fontSize(25)
               .fontWeight(FontWeight.Bold)
           }
           .type(ButtonType.Capsule)
           .margin({
             top: 20
           })
           //引用颜色资源
           .backgroundColor($r('app.color.btn_background'))
           .width('40%')
           .height('5%')
         }
         .width('100%')
       }
       .height('100%')
     }
 }
实现页面间的跳转
页面间的导航可以通过[页面路由router]接口来实现。页面路由router根据页面url找到目标页面,从而实现跳转。使用页面路由请导入router模块。
- 第一个页面跳转到第二个页面。
在第一个页面中,跳转按钮绑定onClick事件,点击按钮时跳转到第二页。“ index.ets ”文件的示例如下:// index.ets import router from '@ohos.router'; @Entry @Component struct Index { build() { Row() { Column() { Text($r('app.string.homePage_Text')) .fontSize(50) .fontWeight(FontWeight.Bold) // 添加按钮,以响应用户点击 Button() { Text($r('app.string.homeClick_value')) .fontSize(30) .fontWeight(FontWeight.Bold) } .type(ButtonType.Capsule) .margin({ top: 20 }) .backgroundColor($r('app.color.btn_background')) .width('40%') .height('5%') // 跳转按钮绑定onClick事件,点击时跳转到第二页 .onClick(() = > { router.pushUrl({ url: 'pages/Second' }) }) } .width('100%') } .height('100%') } } - 第二个页面返回到第一个页面。
在第二个页面中,返回按钮绑定onClick事件,点击按钮时返回到第一页。“ second.ets ”文件的示例如下:// second.ets import router from '@ohos.router'; @Entry @Component struct Second { build() { Row() { Column() { Text($r('app.string.secondPage_Text')) .fontSize(50) .fontWeight(FontWeight.Bold) Button() { Text($r('app.string.secondClick_value')) .fontSize(25) .fontWeight(FontWeight.Bold) } .type(ButtonType.Capsule) .margin({ top: 20 }) .backgroundColor($r('app.color.btn_background')) .width('40%') .height('5%') // 跳转按钮绑定onClick事件,点击按钮时返回到第一页 .onClick(() = > { router.back() }) } .width('100%') } .height('100%') } }
3.无需手动配置新增的第二个页面路由:由于我们选择了用New >Page的方式新建页面,路由表里会自动配置新增的页面路由。
在“ Project ”窗口,打开“ entry > src > main > resources > base > profile ”,在main_pages.json文件中的“src”下自动配置的第二个页面的路由“pages/Second”,示例如下:
{
     "src": [
       "pages/Index",
       "pages/Second"
     ]
   }
使用真机运行应用
HarmonyOS与OpenHarmony鸿蒙文档籽料:mau123789是v直接拿
- 将搭载OpenHarmony标准系统的开发板与电脑连接。
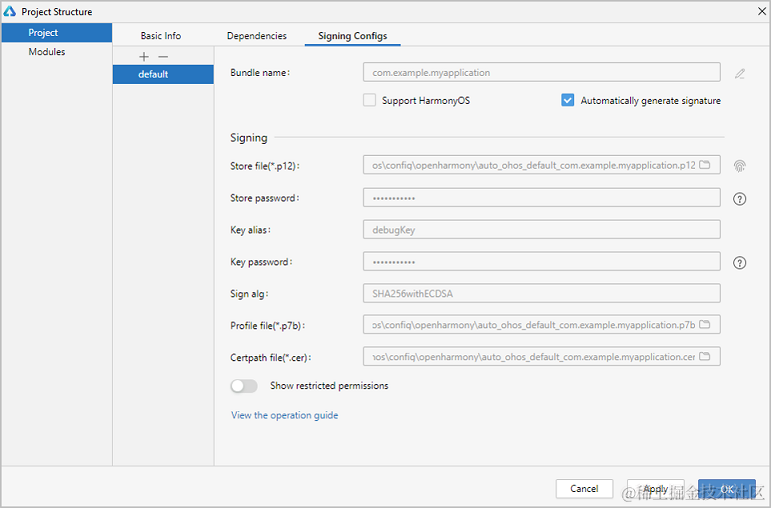
- 点击File > Project Structure... > Project > SigningConfigs界面勾选“ Automatically generate signature ”,等待自动签名完成即可,点击“ OK ”。如下图所示:
- 编译的[详细步骤]。
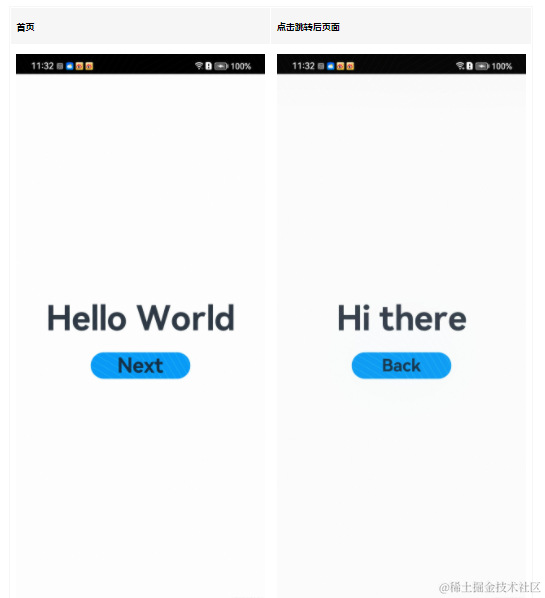
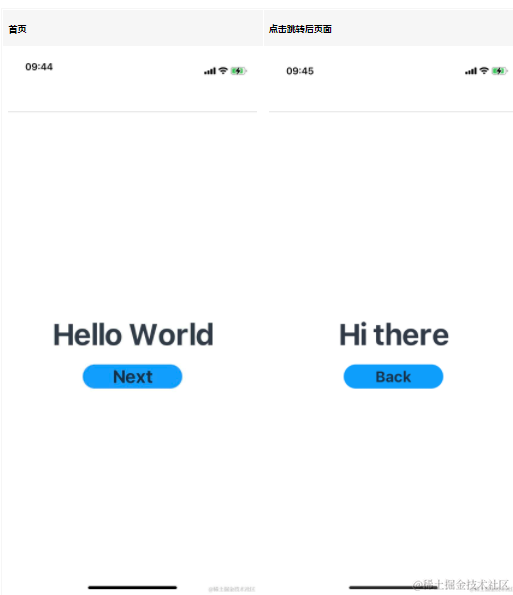
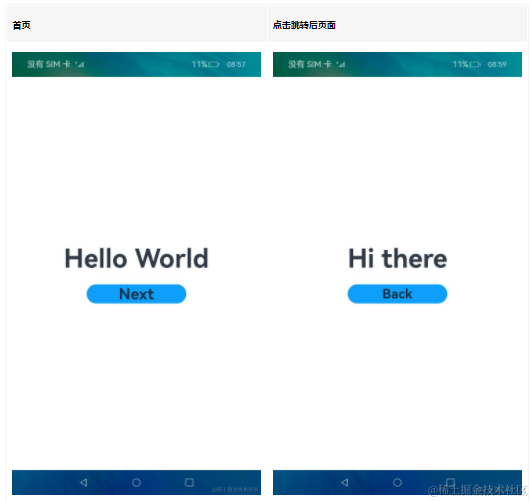
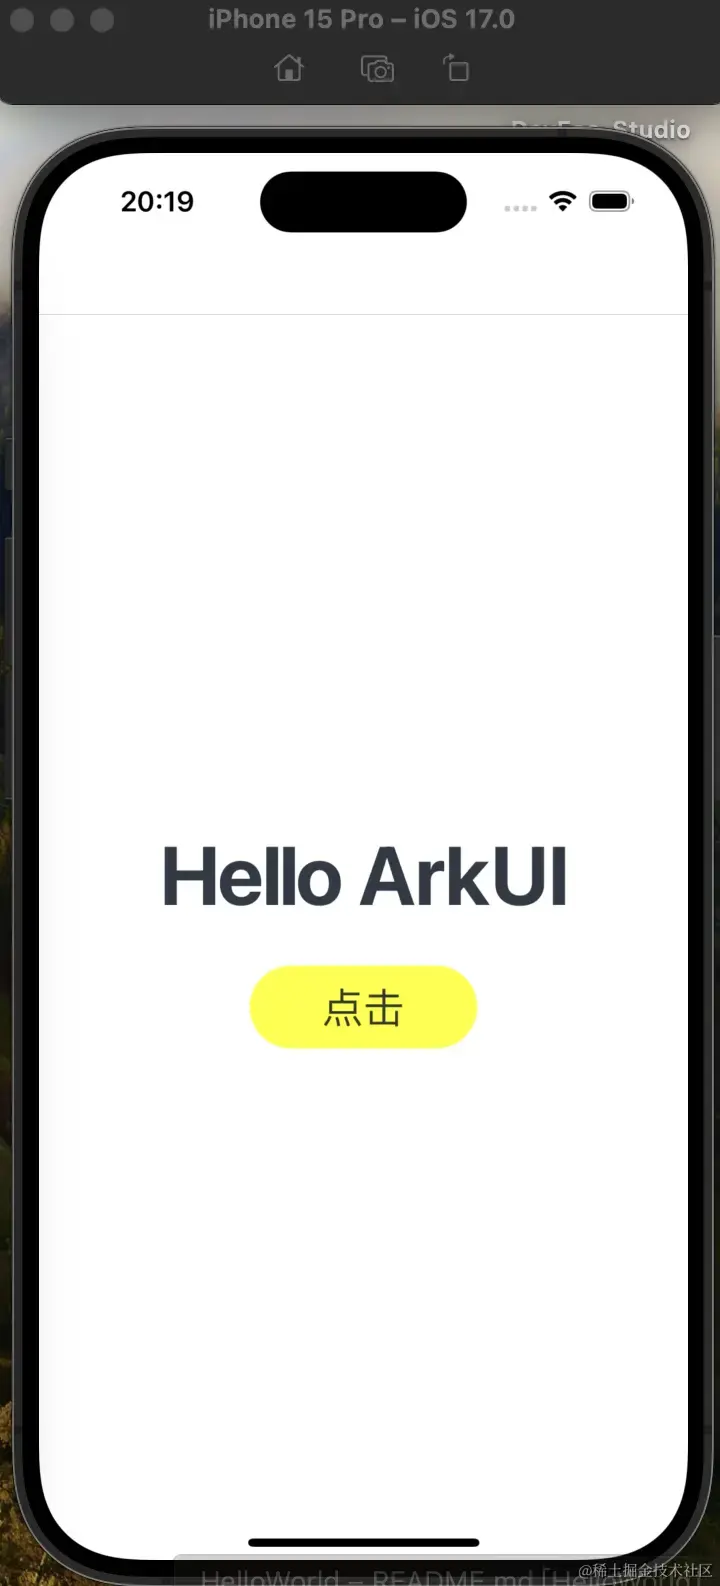
- 效果如下图所示:
- Android平台展示效果
- iOS平台展示效果
- OpenHarmomy平台展示效果
恭喜您已经使用ArkTS语言开发(Stage模型)完成了第一个ArkUI跨平台应用。
审核编辑 黄宇
-
鸿蒙
+关注
关注
57文章
2339浏览量
42804
发布评论请先 登录
相关推荐


 鸿蒙ArkUI-X跨平台开发:【 编写第一个ArkUI-X应用】






评论