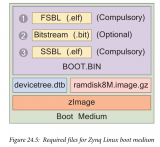
Select create Zynq Boot image under the Xilinx Tools tab. We need to add, in order, the fsbl.elf, system_wrapper.bit, and the u-boot.elf in order to create the BOOT.bin. The fsbl can be found in the zybo_base_system/source/vivado/hw/zybo_bsd/zybo_bsd.sdk/fsbl/debug folder. The system_wrapper.bit can be found in the zybo_base_system/source/vivado/hw/zybo_bsd/zybo_bsd.sdk/system_wrapper_hw_platform_0 folder. In an earlier step we moved the u-boot.elf into a the sd_boot folder. Next specify the output path where you want the BOOT.bin to be generated.

Figure 11: Generating BOOT.bin.

Step 6: Building the Linux kernel
目的:编译Linux内核文件生成uImage
The next step is to build the Linux kernel. Navigate to the Linux-Digilent-Dev folder we downloaded earlier. Now we are ready to compile the kernel. Make sure to run make on the xilinx_zynq_defconfig file to set up the configurations for the zynq chip before compiling the kernel.
Figure 12: Uncompressing the zImage kernel image.
注意:如果这一步出现找不到mkimage工具的错误,可以在线安装mkimage
1.sudo apt-get isntall u-boot-tools
Step 7: Generating the Device Tree Blob
目的:编译设备树zynq_zybo.dts,生成zynq_zybo.dtb
Before we generate the device tree blob we need to make some slight adjustments to the zynq_zybo.dts file found Linux-Digilent_dev/arch/arm/boot/dts. Particularly line 44, 53, and 62. changing the clock prevented an error that occured after booting up to the root shell.

Figure 13: Modifying the zynq_zybo.dts.
Now we are ready to generate the dtb file. After this is complete copy it into the sd_boot folder and rename it devicetree.dtb.
Figure 14: Modifying the zynq_zybo.dts.
Step 8: Partitioning your Secure Digital card
目的:采用gparted分区工具对SD卡进行分区(FAT32+EXT4),将boot.bin,uImage,device.dtb拷贝至fat32中。
There are a couple of ways to do this, the easier way is to use Gparted. A second way is to use the command line tool fdisk. If you do not have gparted it is fairly easy to download and install. Type sudo apt-get install gparted to install it and sudo gparted to run it. Once you have it install plug in your SD card and select it from the drop down window in the top left. If you have any information on the SD card make sure to back it up otherwise select the partition tab and unmount the partition then select and delete the partition. Select the check mark that appears, confirming you wish to delete the partition. Create two new partitions, the first with a beginning offset of 4 MiB. The first partition should be FAT32 and be 1 GiB, the second partition should be ext4 and can take the remaining space.

Figure 15: Partitioning the boot SD card.
Step 9: Obtaining the Linaro file system
目的:在线下载linaro-ubuntu文件系统,将解压后的linaro文件系统拷贝至sd卡中的ext4文件系统中
Download the Linaro file system tar ball from here. We are interested in the last one in the list. Extract the contents and cd into binary/boot/filesystem.dir. Now we need to sync the contents of this folder with the ROOT_FS partition we just created.

Figure 16: Syncing the Linaro root file system with the ROOT_FS partition on the SD card.
Step 10: Booting the ZYBO
Now we need to put BOOT.bin, devicetree.dtb, and uImage onto the FAT32 boot partition. I would recommend creating a temporary folder, mounting the boot partition to that folder, and then using rsync to copy the files over. Once the files are on the correct partition eject the SD card and put it into your ZYBO. Make sure the JP5 jumper is set to SD and JP7 is set to wall. You can boot it from the usb but I would recommend using the wall to power the board. Connect to a uart port terminal, I use GtkTerm to connect to the hardware. It is available in the Ubuntu Software Center, when running it make sure to use sudo as it will need permission to connect to the usb port. Power on the ZYBO and then in the serial port terminal set the configuration to the port where the ZYBO is connected and set the baud rate to 11500, everything else should stay as defualt.
Figure 17: Booting from SD on the ZYBO to the Linaro root shell.
References
[1] Xilinx Getting Started Wiki
[2] Digilent Embedded Linux Hands-on Tutorial for the ZYBO
[3] What-is-Linux
[4] Device Tree Wiki
[5] Initrd Wiki
 德赢Vwin官网
App







评论